80/20 1" T Slot Rail - 40.02" Length
Aluminum - 80/20
3


Aluminum Workstation – why settle for less?
This full-size DIY workstation design is meant to last for decades of rugged use.
In addition, it’s fully customizable. This means that you can build and modify it however you like, and even add more to it later. And of course, you can do all that right here on our site.
The heavy-duty 80/20 aluminum construction style also comes with serious benefits. Aluminum is very easy to clean, it looks great, and it’s very resistant to corrosion and rust. This workstation would be as at home in a workshop, garage, or factory environment as it would be in a home office. No need to worry about spilling coffee here!
Ideal for: organization, work, home offices, small businesses, workshops, and more.
Ready to get started building your own? Great! Just check out the DIY build guide and diagrams below to get started.
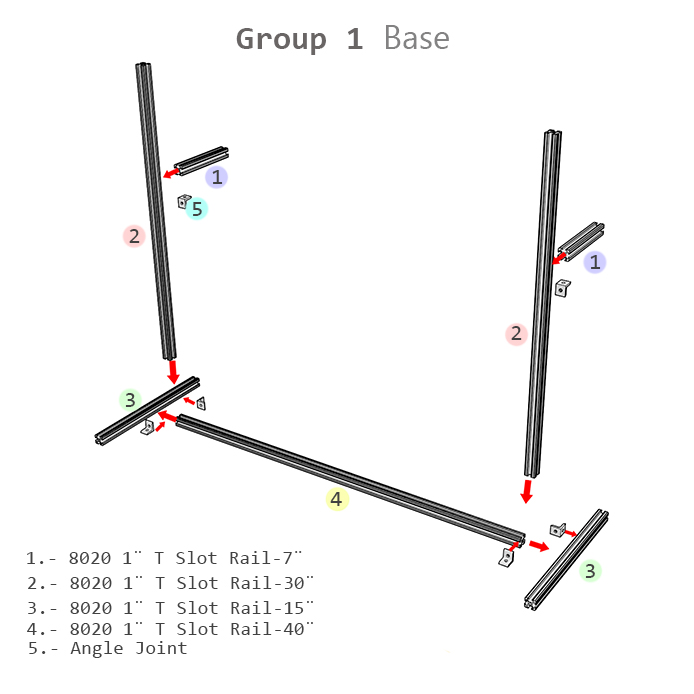
Step 1
All workstations need sturdy, solid bases. So let’s start there.
You’ll want to grab:
First, layout your base. You’ll want to position the 15” rails on either side of the long 40” rail, and then connect them to it using two of your angle joints.
Next, lay the two 30” rails next to each other on a flat surface, and attach the two 7” rails to them using angle joints (as per the diagram). (Laying the longer rails next to or on top of each other will allow you to more easily attach the two 7” rails to them at exactly the same height/distance. As the back of your workstation will rest on these two short rails, it will help if they are both at the same height to begin with. Don’t worry though: you can lay the workstation down later and re-adjust them if needed.)
Finally, attach the vertical 30” legs to the top and center of the 15” inch rails, using two more of your angle joints.

Step 2
Now, it’s time to set up the back frame of your workstation. For this step, you might want to lay the pieces out in the middle of your floor, before standing the assembled frame up later.
You’ll need:
To start, connect the 19.25” T-Rails to one side of a 43” rail (as in the diagram). This 42” will then become the right-side vertical rail for the wall frame.
Then, using an Inside End Joint, connect the 43” rail to the bottom right of the 42” long top rail. The Inside End Joint should screw neatly into the end of the 43” side rail, and slide neatly into the structure of the 42” long top rail.
Now, using another Inside End Joint, attach the 32.5” rail to the bottom of the top rail; and slide it all the way over it until it meets the ends of the two shorter 19.25” rails. Attach this rail to the 19.25” ones using two Angle Joints.
Last piece: using another Inside End Joint, attach the left side 43” side rail to the bottom of the top rail, on the far left side.
And now, you have a wall frame for your workstation!

Step 3
It’s time to connect the back wall frame to the base, and to attach the “desktop” portion.
NOTE: we recommend leaving the wall frame on the floor for now, and connecting the base to it there (and then standing the whole workstation up later). This will make it easier to attach the Top Frame in Step 4. Of course, if you’re comfortable working above your head: you can also feel free to stand the frame up now.
For this step, you’ll need:
First, connect a 40” T-Slot Rail to the bottom of your assembled ‘wall frame’ using two angle joints. Ensure that it sits flush with the bottom of the center vertical rail (this 40” rail will form the back edge of your desk).
Next, connect your already assembled base to your wall frame using two Angle Joints. This can be accomplished with the unit in either a vertical or horizontal position.
NOTE: make sure the wall frame sits “on top of” the short 7.5” rails (rather than vice-versa).
Then, assemble and connect the rest of your desk frame.
Finally - build and connect your shelf frame. To do so, connect two 7.75” rails to the outside ends of one 11.5” rail, using two Angle Joints. Then, connect the shelf frame to the back wall frame (wherever you’d like to) using two more Angle Joints.

Step 4
Almost there! It’s time to add the top frame, and the desktop mount.
You’ll need:
For the desktop mount:
For the top frame:

Step 5
Finally – the last step! Time to add the paneling, wheels, end caps, and of course: your heavy-duty ball mount.
You’ll need:
First, install the wheels. We recommend leaving the unit horizontal for this, as it can make this process easier.
Then, install your end caps. Every top and bottom exposed face of an 80/20 rail should get one.
And now, for the paneling. PLEASE NOTE: acrylic can sometimes crack when handled improperly. Please, work gently with the acrylic panels, and don’t overtighten the screws or hangers.
First: install four single panel hangers on all four inside corners of your desk area (as per the diagram). These rest on the top edges of the frame (rather than the bottom).
Then, install two double panel hangers on the top of the desk centerline rail; one in front and one in back. Then, firmly but gently affix your 20” acrylic panels to these.
Next, use four single panel hangers to affix your 7” acrylic panel to the top of your shelf frame.
And finally, attach your heavy-duty ball grip in the appropriate place.
And that’s it. Congratulations! Time to stand back, admire your work, and maybe even put your new workstation through its paces.
Enjoy!